Showing posts with label DSC. Show all posts

Thursday, 1 September 2022

Port Louis Upgrades and Maintenance

Hi everyone,

!!! This post is brought to you by Starlink !!!

We've now been in Port Louis Marina at St George's, Grenada for three months.  It's been great but it's nearly time to move on.

For every new power producer there's a consumer!

Over recent weeks we've had a series of maintenance and upgrade tasks to do.  These followed the arrival of two consignments from the US, assisted by Portage Import, Export & Brokerage.  The shipping service isn't fast but it was reliable and affordable.

Our first shipment included a Mac Mini M1 and peripherals.  The Mini travelled from Apple US to MikeGyver.com to be adapted for 12Vdc power.  Mike and his team did a nice neat job and the Mini is running directly off 12Vdc ship's power.  It uses so little power we retired our BeagleBone Black which had been running our SignalK server 24/7 very reliably for two years.  SignalK is now running on the Mini.

Migrating our data from our laptop to the Mini was simple.  However the Mini uses Apple's M1 processor where our Macbooks used Intel processors.  Most of our apps worked fine, some needed a little effort and a few were problematic.  A little effort was needed for the SignalK-related apps - the server itself, the InfluxDB database app and the Grafana graphing app.  It was certainly worth the effort for the Mini's low power.

The most work related to the Parallels app which allows us to run Windows and other Operating Systems.  The only version of Windows which Parallels can run on M1 is Windows 11 for ARM64.  So we upgraded from Windows 10.  The main software we use on Windows is Winlink Express which runs but there's no driver for our Icom IC-7300's Silicon Labs USB-Serial Bridge chip.  So the software can't control the radio.  Bugger!  Hopefully one will appear soon.

Talking of our Icom IC-7300 SSB, it has moved from the saloon onto the nav table.  A great improvement made possible by mounting the Mini on the instrument panel and its display above...

New Navigatorium!

Although we currently have an Amateur SSB we've had Marine SSBs in the past.  At that time we experimented with HF DSC, including running skeds partially via DSC.  Without a DSC-equipped transceiver we can't transmit DSC messages but we can receive them.

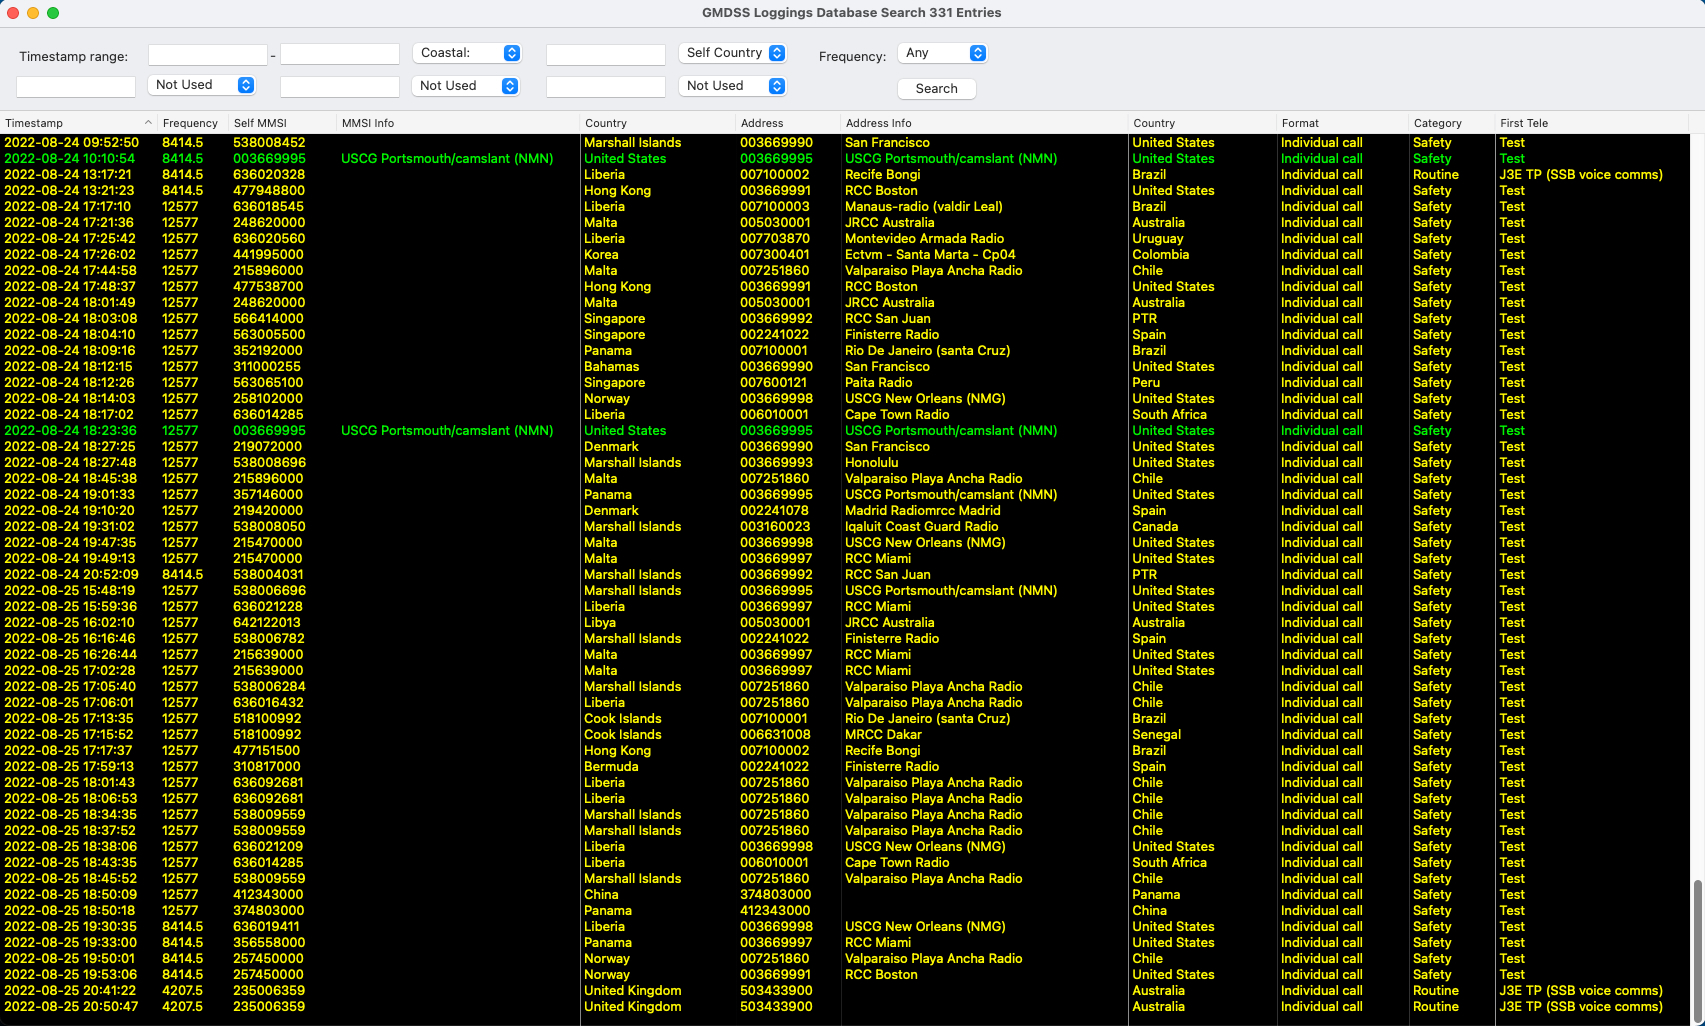
We're using BlackCat System's GMDSS software.  It listens to the audio output from our SSB and decodes messages.  Here's its main window with two decoded messages (to us!) shown, then the database search window, and finally its statistics window.

BlackCat GMDSS main window

BlackCat GMDSS database search window

BlackCat GMDSS statistics window

The software works very well but sadly does NOT support decoding of DSC Group Calls.  I've asked BlackCat to add this functionality.  What it can do is sound an alarm when a distress message or a message with user-defined text (eg your MMSI) is decoded.  I reckon it's pretty useful for bluewater cruisers even if its target market is Amateur Radio folk.


Our second shipment finally arrived this week.  Turned out it was held up in customs due to my two forenames being used and them thinking I was two people.  In the end it all got through and was in good shape.

Better than Christmas!

One of the packages in the shipment was a Starlink system.  We purchased the 'RV' plan which allows use throughout a 'continent'.  Use while in motion is not supported (although many find it works) and it stops working outside 'territorial waters'.  We want it primarily to improve our bandwidth at anchor and in marinas.  We do hope to use it when crossing oceans but that's several years away for us.  The system cost roughly US$700 to buy plus US$130/month to run.

Setting up Starlink is famously simple.  Worked out that way for us too...

Step 1 - admire the box


Step 2 - empty the box

Step 3 - admire the router, antenna and two cables


Step 4 - mount the antenna (temporary mount shown)


The next steps were to connect the cables, for us replace the US plug with an Aussie plug, plug everything in, connect to the STARLINK WiFi access point and open the Starlink app.  It immediately required a new access point name and password.


With the new name and password we were done - Setup Complete!  And we were online.  Nice!


The next step was to run the Speed Test.  The pictures say it all...


We left the system on for the evening and overnight in case it wanted to download any updates.  In the evening we watched some TV.  The bandwidth used is shown below.  While watching YouTube we get US ads instead of the French ads due to our French Digicel SIMs.

We are seeing occasional Starlink drop-outs, some of which last several minutes.  This was expected since we're surrounded by masts.

Usage while watching TV


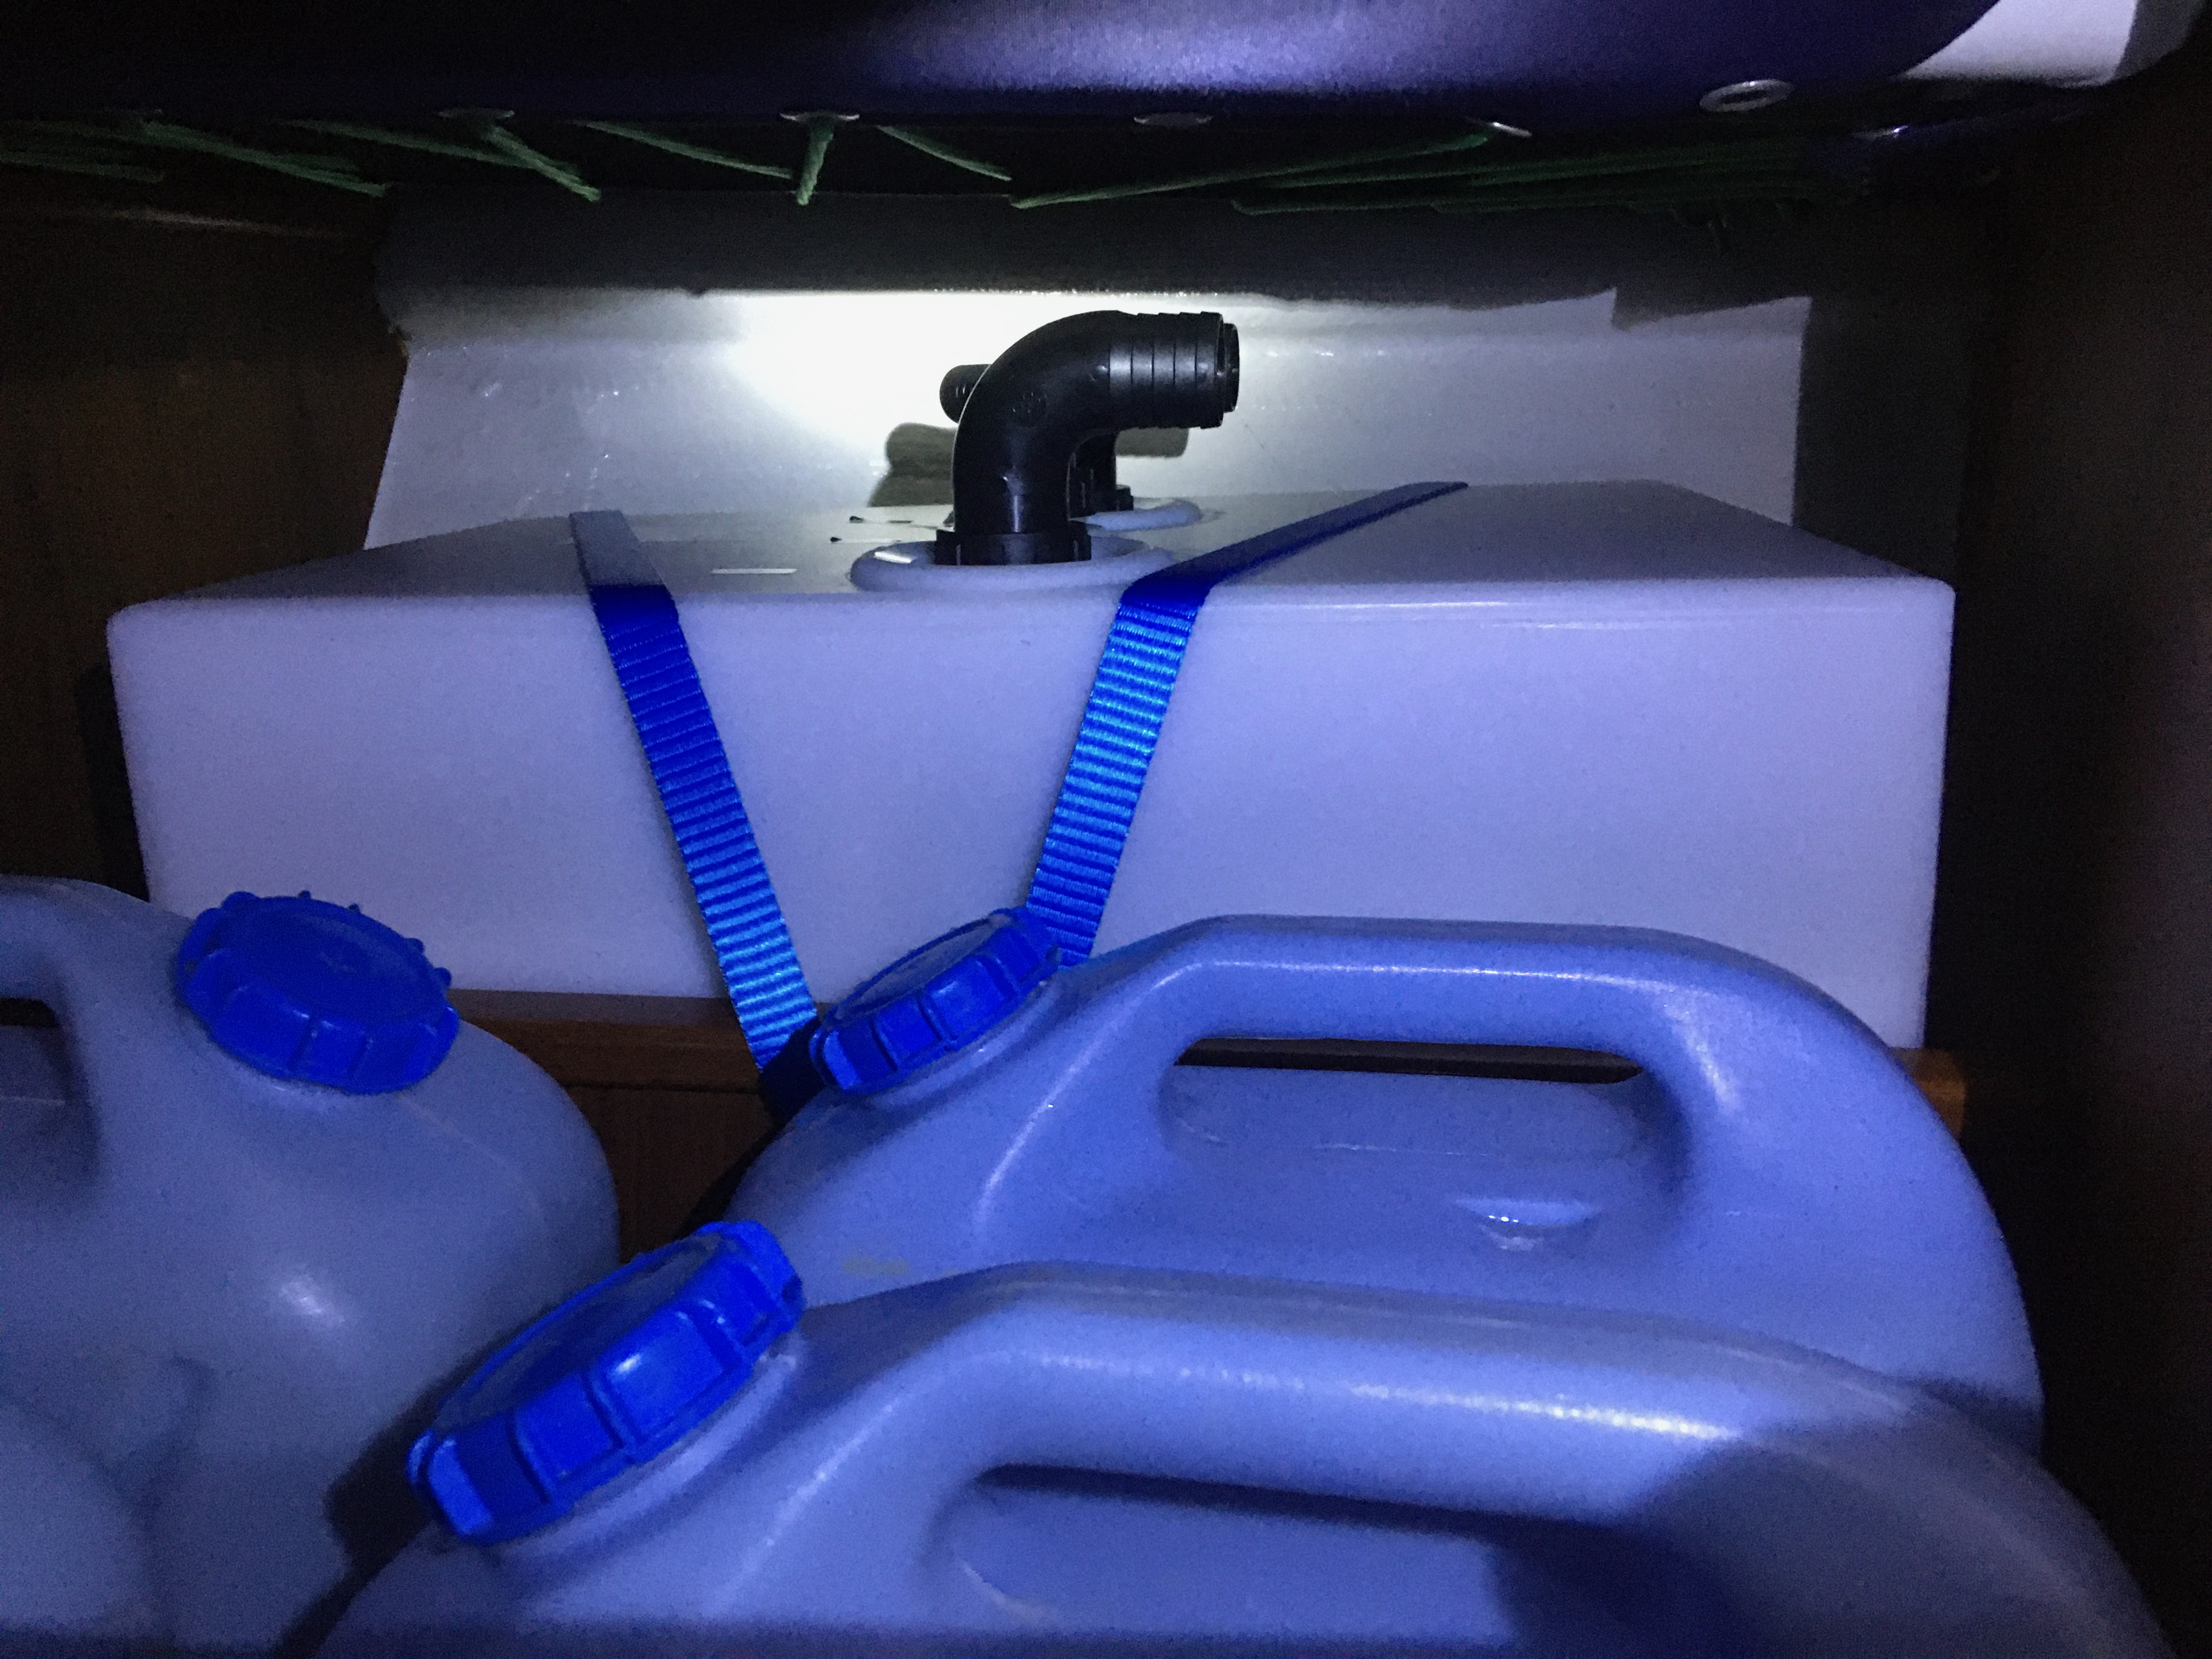
The next package was from TekTanks in the UK (via the US which saved us over £100).  At last we have a holding tank.  Capacity 64 litres and it fits in the forepeak immediately forward of the head compartment...

Last look before mounting

Mounted

Now to connect her up!

The next set of packages contained two Renogy 100W solar panels plus cables and fittings.  The panels are now mounted on our fixed lifelines outboard of the cockpit.  They'll swing up while in use.  Not yet wired-in but a perfect fit and looking good.

One of two new 100W solar panels

Renogy Energy

Other boat jobs over the last few weeks have included:

  • woodwork on new marine-ply saloon table for both dressmaking and dining;
  • electrical circuit breaker re-arranging;
  • tidy-up of SSB antenna feed;
  • service our manual anchor windlass;
  • continued close monitoring of our new Lifeline LiFePo4 batteries;
  • bent on, hoisted and furled staysail and yankee; and
  • dived to clean the very dirty propellor and rudder

Last weekend we did our final Grenada Hash House Harriers walk.  It was inland from St George's in very nice country-side, albeit very steep in places!  Twas good to almost keep up with the Ceruleans.

The Ceruleans lead the way


On On!

Trust all's well where you are!


Tuesday, 13 July 2021

Bluewater Cruising Long Range Communications

This is a technical post!  It describes the methods blue-water cruisers use for long-range communication between themselves and to keep in touch with the outside world.  I wrote it recently for the Bluewater section of the Cruising Association.  You can view it on their website here (login required).

WinLink Coast Station Network

HF/SSB (High Frequency/Single Side Band) and satellites are the two ways of achieving long range (beyond line of sight) communication.  The former uses the ionosphere.  The latter uses communication satellites as intermediaries.


Our blog includes a number of technical posts including HF/SSB, satellite communication and many other topics.  You can search for content using the "Search this Blog" box at the top left of this page or the "Word Cloud" on the right (eg HF or SatCom).  Alternately use these links:

HF/SSB

Marine HF/SSB radios are used to keep in touch directly with other cruisers, to access email and to obtain weather information.  A GMDSS DSC-equipped marine HF/SSB provides long distance distress and safety communication with coast stations, ships and potentially other yachts in an emergency.


HF/SSB radios require proper installation with an antenna tuner to a back stay or whip antenna and an effective ground.  Installation can significantly add to the cost.  Careful attention must be paid to initial testing and ongoing maintenance.  HF/SSB optimisation often takes time and experimentation and this can’t be done effectively in a marina.


HF/SSB radios are designed to run on 12V DC power.  Transmit power consumption is high (around 30A), requiring careful installation with minimal connections.  However transmission is usually for short periods and so consumes few AmpHours.  In contrast receive power consumption is 1A to 2A and so consumes significant AmpHours if run continuously.  This impacts on marine HF/SSB DSC routine calling since few cruisers have their radios running continuously.


Marine HF/SSB radios can receive over the full LF/MF/HF range (100kHz to 30MHz) but limit transmission to marine bands.  This limit can be overridden on most radios.  Transmitting on amateur bands requires an amateur licence. Transmitting on other bands (eg aviation, military etc) is forbidden except in emergency.


Zen Again's previous Icom M802 Marine HF/SSB


Marine HF/SSB radios are designed and built to high standards imposed for marine communication.  Amateur HF/SSB radios are less expensive, just as capable and can be more fun to use.  But they do NOT meet the marine standards.  Therefore marine HF/SSB radios are allowed to transmit on amateur bands, but amateur radios must NOT transmit on marine bands.  The extent to which this is enforced appears limited, particularly mid-ocean and in remote areas.  Many blue-water boats fit amateur HF/SSB radios.


Selection of frequency and time of day are vital to successful use of HF/SSB.  This is due to the dynamic nature of the ionosphere which delivers (or removes) long range HF propagation.  Low cost software is available to predict the best frequencies and times of day for communication between nominated locations.


Keeping in Touch

Many cruisers keep in touch with other cruisers via SSB ‘nets’ or ‘skeds’.  These are simply an agreement to meet on a given frequency at a given time.  They range from informal nets between pairs or groups of boats to more formal nets, some of which are run by coast stations.  For example the ARC organisers run nets for participants to report position and weather, and to allow participants to chat afterwards.


Groups of cruising boats embarking on ocean passages often arrange a daily net to keep in touch.  They allow the exchange of safety information and social chat which can be a highlight of the day.  Nets are sometimes followed by a kid’s net, where younger cruisers can catch up with their pals.


Net control is often handled by the boat with the best radio installation.  The controller first requests any safety traffic then asks each participant for their report in turn, logging key information.  Each report includes the boat position, their status, plus perhaps weather and a daily highlight.  Positions should be stated slowly and clearly, and NOT contain decimals of minutes.


Email

Email can be sent and received via HF/SSB.  For non-amateur license holders this requires a Pactor hardware modem, Airmail PC software and (most commonly) a subscription to the SailMail global network of coast stations.  Amateur licence holders can use a Pactor modem or a software modem embedded in PC software to access the Winlink global network of coast stations.


The email data rate is similar to that achieved using a satellite phone, being hundreds of bytes/second.  Data rate varies dynamically with HF propagation conditions.  Sensible frequency and time of day selection is important.  Attachments such as GRIB files are supported, allowing the reception of weather GRIB data from services such as SailDocs.


RadioFax, RTTY and Shortwave

Radio facsimiles of weather, ice and other information are transmitted from a shrinking set of coast stations around the world.  A RadioTeletype (RTTY) weather service is also provided in some areas.  Shortwave broadcast stations all around the world allow blue-water cruisers to monitor news mid-ocean.  These services require only a SSB receiver.  Radiofax and RTTY are decoded using low cost software available for PC and tablets.


Amateur (Ham) Radio

Amateur radio operators are licenced following completion of a training course.  Courses are run by amateur radio clubs.  Licenced amateurs can communicate with other amateurs across the world.  They can use voice, CW (morse) and data in designated amateur frequency bands which span MF, HF and beyond.  This opens up a global network of contacts useful for both routine and emergency traffic.  Licenced amateurs can join the free Winlink email service and take part in amateur nets.


Zen Again's current Icom IC-7300 Amateur HF/SSB


Several nets are run by groups of amateur coast stations.  An example is the Maritime Mobile Net on 14300Hz.  Some of the coast stations have rotatable directional antennas, very high transmit power and very sensitive receivers.  These nets provide safety coverage over very wide areas.


Amateur bands below 10MHz use LSB (Lower Side Band) for voice – unlike marine bands which use USB (Upper Side Band) regardless of frequency.  There are no predefined voice channels in amateur bands, one simply picks a free frequency within an amateur band.  CW is usually found at the lower frequencies in each band, then data, then voice at the higher frequencies.  Amateur nets run on published frequencies.


Satellite

Most blue-water cruisers carry one or more satellite devices.  These range from simple messaging devices to email-capable satellite phones to internet-capable broadband satellite terminals.  Portable satellite devices run on their internal batteries and so can be used in a liferaft, unlike a HF/SSB.


Satellite devices generally allow voice communication between two parties.  This is fundamentally different to HF/SSB where anyone within range can take part in a conversation (eg a net).  Hence HF/SSB is more social.  Satellite devices and services are rapidly evolving and are easier to use.


Satellite Messaging Devices

These devices are inexpensive and simple to use.  They provide a means of sending and receiving short messages.  They include a GNSS receiver, allowing position to be transmitted with each message.  These positions can be used to create a web page showing your track.  Many include a (non GMDSS) emergency function.  They use a built-in antenna.


Satellite Phones

These devices provide voice, text and many are also data capable.  Data rate is hundreds of bytes/second which is sufficient for email but not for internet browsing.  The most common use of satellite phones is for email, including accessing weather GRIB files.


These devices can use either their built-in or an external antenna.  For data use the external antenna is recommended.  The external antenna is omnidirectional and usually no larger than a coffee mug.


Iridium Go! 


A popular satellite phone is the Iridium Go!.  This unit provides a WiFi hotspot to which smart phones and tablets can connect to use voice, text and email.  PC software such as Airmail, Winlink, XGate and PredictWind’s Offshore app can control the Go! to access email and/or download weather information.  The Go! incorporates a GNSS receiver for tracking purposes.  The GNSS antenna is built into the base unit - it isn't in the external antenna!


Broadband Satellite Terminals

These devices provide broadband data rates and provide voice, text, email and full internet browsing.  Until recently they have required large mechanically-stabilised antennas.  Newer units use electronic ‘beam steering’ antenna technology which do not require stabilisation and are smaller.  These systems remain expensive to buy and expensive to run.


New satellite constellations such as StarLink may soon offer broadband at similar cost to satellite phones.  This may revolutionise safety at sea by allowing real-time traffic, weather and ocean surface current viewing.  It is not yet available.


Sunday, 17 April 2016

DSC Global NavArea Group IDs

Hi everyone,
HF DSC (Digital Selective Calling) is a technical topic I've posted about previously here.  We've been using routine DSC calling on Zen Again for some years now.  We use it to contact individual yachts, to exchange positions with individual yachts and to contact groups of yachts.  Most recently we used routine DSC calling while HF net controller during our Indian Ocean and South Atlantic Ocean crossings.

Icom HF Radio in DSC Watch
Recently a new DSC initiative has been announced.  The NavArea Group Calling Network ("Network" below)  officially establishes a set of Group IDs.   Each Group ID is intended for use in one of the global NavAreas.  The NavAreas are illustrated below...

NavArea Map
The Network builds on previous work which agreed routine DSC frequencies for use by yachts.  See my previous post (here again) for the details on this.  The agreement on frequencies allowed yachts to reconfigure their HF/SSB radios to scan those routine frequencies in DSC Watch and so receive routine (vice distress, urgency and safety) calls from other vessels.  Distress, urgency and safety calls are still received, either by scanning a mix of distress/routine frequencies in DSC Watch or by having an antenna connected to the second antenna input on the radio.  Note that distress, urgency and safety broadcasts should still be transmitted on the distress DSC frequencies!!!

Routine group calling was possible, but only if preplanned prior to a passage since a known Group ID is needed to make a Group call.  In most countries the unique Group ID of a yacht is its individual MMSI shifted right by one character.  So Zen Again's 503433900 becomes 050343390.  So it's actually very easy to arrange a Group ID for use amongst friends.  This use of DSC groups involves "closed groups" in that their ID is not publicly known - an important point.

For our recent ocean crossings we gave our Group ID to other yachts with DSC HF/SSB radios.  They added our Group ID to their radio's address list.  We could then make a routine call to this Group ID and all the radios (in range) with that Group ID programmed would receive the call.  If accepted their radios would change to the traffic (DSC-speak for voice) frequency and our net could start.  Needless to say their radios needed to be turned on and in DSC Watch mode!  This worked well.

However, what if you're at sea and want to contact any other yacht(s) in range?  This is a key advantage of the Network.  By programming your radio with the Network's Group ID for your current NavArea you can make a routine call to the relevant Group ID.  All vessels with this Group ID programmed and their radios in DSC Watch will receive the call.  So this is a great way to make contact with other yachts in your region.  It could be used to seek assistance in situations short of Urgency (DSC-speak for "PanPan").  This use of DSC groups involves "open groups" in that their ID is publicly known - an important point.

So here are the Network's Group IDs...

NavArea Group IDs
Note that the Group ID is constructed from:  "0" denoting group; three digits being the country code of the country coordinating the NavArea; two digits being the NavArea number; and "000" at the end.  So they are potentially easy to construct from onboard resources in extremis! ;)

The table above is copied from Brunei Bay Radio's web page (here) describing the Network.  Allan at BBR is one of the instigators of the Network.  The instigators were:


It is likely that various coast stations will start to program their radios with the Group ID for their NavArea.  For example local volunteer organisations may use Network Group IDs to announce position reporting skeds.  Northland Radio in New Zealand (http://www.northlandradio.nz) is already doing so.  It seems likely that offshore races and rallies will start to use routine DSC calling to initiate their skeds/nets in future, and may require the Network Group IDs to be configured.

SAR organisations do NOT monitor these Group IDs, regardless of what frequency they are used on.  They listen on the distress DSC frequencies only, and for broadcasts or their individual RCC MMSIs only.  Additionally it is important to understand:  the distinction between distress and routine DSC frequencies; whether your HF/SSB radio has a separate DSC antenna connected; and which DSC frequencies (distress/routine and frequency bands) your radio is scanning while in DSC Watch.

The Network is a great initiative.  However it suffers from the same issue which afflicts all HF/SSB radios.  That is power consumption.  HF/SSB radios use a lot of power, and most yachts don't have power to spare.  This initiative currently appears to presuppose yachts keep their radios on 24/7.  Sadly this is not practical and most cruisers simply will not do it.  A solution would be to define a watch schedule.  This would fix the power issue but would we all remember?

I am developing an easily installed "black box" (working name SSB Minder) which sits alongside an Icom M802 or M801E radio, controlling it via a user-defined schedule.  The SSB Minder consumes minimal power.   It uses the Icom's Remote port to turn the Icom on and off per the schedule.  This saves a lot of power and helps avoid missed DSC Watch periods, skeds, nets and your favourite shortwave radio program since your radio wakes YOU up on time!!!

I will soon be seeking volunteers to trial SSB Minder prototypes

I will be posting a full description of SSB Minder in the next few days.

Congrats to Terry, Bob and Allan for initiating the Network.

Wednesday, 10 June 2015

HF/SSB DSC Routine Calling with Icom M801E/M802

Hi everyone,
For some years we've been using DSC routine calling on VHF.  It is useful for contacting ships at sea (to arrange separation) and also for meeting another yacht directly on a working channel without having everyone in range follow you there from channel 16.

In 2012 we started looking into using DSC on our HF/SSB.  This blog describes how we configure and use DSC on our Icom.

!!WARNING!!  This is just how we use our radio.  Your needs may differ from ours.  !!WARNING!!


What is HF DSC?

DSC stands for Digital Selective Calling.  It uses digital transmissions so has better propagation characteristics than voice.  DSC is best known for its use in sending distress calls, but it supports a broad range of uses.

DSC calls have various characteristics:
  • Purpose:
    • to negotiate a traffic frequency for voice communication
    • to communicate GPS position (requires NMEA0183 GGA sentence input to radio)
    • both of the above (eg in a safety/mayday situation)
  • Addressing:
    • Individual
    • Group
    • Area (geographical)
    • All Ships (broadcast)
  • Categories:
    • Distress (Mayday)
    • Urgency (PanPan)
    • Safety (Securite)
    • Routine
Unfortunately routine calling is made difficult by Icom's default configuration.  By default they are configured only with emergency channels.  Using emergency HF DSC channels for routine traffic is not permitted.  Happily reconfiguring the radio isn't difficult (tedious perhaps but not difficult).

Note that Icom M801E and M802 units have two antenna connections.  One is to the main transceiver and the other is to a second receiver.  The latter continuously scans the six main emergency DSC frequencies - regardless of what the main transceiver is doing.  The second antenna can be a piece of insulated wire, 4-8 metres long, run around inside the boat (unless the hull is metal).

History

Way back in 2007 US-based KA7WJA of sv Annie Laurie posted a suggested reprogramming of the M802 to support routine calling.  See that posting here.  More recently Commander T L Sparks published a book "Icom IC-M802 Made Simple for Cruisers".  The book describes the same method in detail.  The book only appears to be available via eBay.

Configuration Overview

All DSC-related configuration can be done manually on either M801E or M802.  It is possible to purchase Icom's CS-M802 configuration software for the M802.  I'll describe manual configuration here but first here is a screenshot from the software showing the DSC Rx/Tx Frequencies table...


The table lists three types of frequencies...
  • Call = DSC data frequency
  • Scan = Up to six DSC call frequencies to be scanned for incoming calls in DSC Watch
  • Traffic = voice frequencies the radio can switch to after the DSC call completes
The scan frequencies are all routine DSC call channels which suits boats with the second antenna connected.  If you don't have the second antenna you may wish to configure three emergency channels and three routine channels - for example pairs in the 4, 8 and 12 MHz bands.

MMSI Check

DSC won't work at all without your MMSI configured.  Here is the procedure to check it...

1.  Click DSC key to enter DSC Watch the click MODE button
2.  Scroll (using CH dial) to Setup and click ENT button
3. Scroll to MMSI Check and click ENT button
4.  Check your MMSI is correct then click ENT to exit MMSI Check or/then MODE to exit to DSC Watch
The above procedure also serves as an introduction to navigating the DSC menus.  The text at the bottom of the screen should show you your options with reverse-video showing the button to use and the normal video showing the action which results.  However this isn't always intuitive.  For example at step 3 clicking CH should select but actually moves you back one level in the menus.

If you don't have an MMSI it's "game over" until you do.  If you but it is not configured then follow the instructions in the manual to configure it - very carefully!  With that done, read on!

Scan Frequency Configuration

Next we will replace the existing scan frequencies with frequencies intended for routine calling.  We can do this since our second antenna keeps on listening to the emergency frequencies regardless.  The scan frequencies should be configured as illustrated in the table in the Configuration Overview section above.  Note that all frequencies are simplex so Tx=Rx.  Here's the procedure, starting from the DSC Setup menu...

1.  Scroll to Scan Frequency and click ENT button
2a.  Scroll to each tx/rx frequency in turn and click ENT button
2b.  Push and hold CE button until beep to delete the frequency
2c.  goto 2a and repeat until all 6 frequencies deleted
(Note - the image above shows a configuration for a radio with only one antenna)
3a.  Scroll to <add> and click ENT button
3b. Enter the Comment, TX and RX fields, with a leading zero in frequency fields if necessary
3c.  Click the ENT button when fields correct
3d.  goto 3a and repeat until all 6 frequencies added
At the end of this procedure you should have six new scan frequencies.  Your radio can now receive and respond to incoming DSC calls.  To confirm correct configuration return to the DSC Watch screen and you should see the newly configured frequencies being scanned.

Expect to see the screen cycling through the six routine frequencies configured
Call Frequency Configuration

Next we will replace the existing call frequencies with frequencies intended for routine calling.  The call frequencies include the six scan frequencies plus others we don't scan.  This is to ensure we have them somewhere in case we wish to change the scan.  The call frequencies should be configured as illustrated in the table in the Configuration Overview section above.  Note that all frequencies are simplex so Tx=Rx.  Here's the procedure, starting from the DSC Setup menu...

1.  Scroll to Call Frequency and click ENT button.
2a.  Scroll to each tx/rx frequency in turn and click ENT button
2b.  Push and hold CE button until beep to delete the frequency
2c.  goto 2a and repeat until all frequencies deleted
3a.  Scroll to <add> and click ENT button
3b. Enter the Comment, TX and RX fields, with a leading zero in frequency fields if necessary
3c.  Click the ENT button when fields correct
3d.  goto 3a and repeat until all frequencies added
Traffic Frequency Configuration

Next you will replace the existing traffic frequencies with the voice frequencies you frequently use for talking with other stations.  These can be any marine band ship to ship channel.  Our list copies the User Channels we have configured in the radio.  Your traffic frequencies can be configured as illustrated in the table in the Configuration Overview section above, or with whatever traffic channels you prefer to use.  It is logical to include at least one traffic frequency in each band having a call frequency configured.  Here's the procedure, starting from the DSC Setup menu...

1.  Scroll to Traffic Frequency and click ENT button.
2a.  Scroll to each tx/rx frequency in turn and click ENT button
2b.  Push and hold CE button until beep to delete the frequency
2c.  goto 2a and repeat until all unwanted frequencies deleted
3a.  Scroll to <add> and click ENT button
3b. Enter the Comment, TX and RX fields, with a leading zero in frequency fields if necessary
3c.  Click the ENT button when fields correct
3d.  goto 3a and repeat until all frequencies added
Your radio is now configured to send as well as receive DSC calls!

Configuring Address IDs

It is convenient to configure a set of stations in the radio's "Address Book".  This causes the radio to show their name instead of their MMSI which is much easier to work with.  We configure boats we are sailing with and also RCCs (Rescue Coordination Centres) in our cruising area.  Here is the procedure to add a single entry from the DSC Setup menu...

1.  Scroll to Address ID and click ENT button.
2.  Scroll to <add> and click ENT button
3.  Enter Name, ID, TX and RX fields then click ENT
Note that the TX and RX fields should match one of your calling frequencies

Configuring Group IDs

Group IDs allow the transmission of DSC calls which do not require acknowledgement.  All stations in the group ring an alarm and the operator can accept the call to have the radio change to the nominated traffic frequency - a nice way to start a sked!

Group IDs (ie MMSIs) are normally a simple juggle of the ship's MMSI.  Shift all the numbers right by one digit and add a zero at the front.  That's your vessel's Group ID.  So Zen Again's MMSI of 503433900 translates into our Group ID of 050343390.  Join us now!

Making a DSC Call

There are a number of menus to step through to make a DSC call.  Fear not - they are mostly self-explanatory!  Here's the procedure to make an individual, routine call to Vulcan Spirit from Zen Again...

1.  Scroll to Individual and click ENT button.
2.  Scroll to Routine and click ENT button
3. Scroll to Vulcan Spirit and click ENT button
4.  Scroll to the traffic (ie voice) frequency you wish to talk to them on and click ENT button
5.  Scroll to the call frequency you wish to call them on and click ENT button
6.  The call is now setup and read to go.
6a.  Push and hold CALL until the radio beeps and starts transmitting; or
6b.  Click ENT button to add this call into one of 10 Transmit Memories
7.  Presuming you CALLed, you should see a screen like this for several seconds
8a.  Then the radio waits for an acknowledgement from the recipient.
Note - the recipients radio must be on, in DSC Watch and they need to check the radio screen regularly!
8b.  When acknowledgement received click FREQ to change to the traffic frequency
8c.  Use the radio as normal to communicate with the other vessel

Conclusion

I hope the information presented here is useful.  This blog will be expanded over time as I manage to capture screenshots showing acknowledgements etc.  Comments welcome!