Hi everyone,
This is a technical post. It is the second of two posts describing how we installed and setup software to capture, record and display data from our NMEA-2000 network. The first post described how we did so on a Macbook laptop running Mac OS X. This post describes how we moved the NMEA-2000 capture and recording onto a cheap, low-power BeagleBone Black (BBB) computer.
Updated to describe installation on both Debian 9 and Debian 10
Appended notes following several months use
 |
| 24 hours at anchor in Poole Harbour |
 |
| BeagleBone Black (beaglebone.org photo) |
Here's how we did it, noting that we have an ActiSense NGT-1 NMEA-2000 to USB interface directly connected to the BBB. If you follow in our footsteps you should replace 'ZenAgain' with your boat name, and our IP addresses to your own. Needless to say, the BBB and Macbook are on an ethernet network and they have internet access during this installation process.
NOTE1: Commands were executed in a ssh session, in our case from our Macbook. We connected as the default user 'debian' but used 'su' and 'sudo' for some commands. This is shown below.
NOTE2: I'm NOT a Linux expert and made many mistakes along the way. I believe what follows is correct but there may be errors. Proceed with care and backup your BBB before starting!
NOTE3: An advantage of the BBB over the Raspberry Pi is it runs from 5.0V, not the weird 5.1V demanded of current Pis. We use this power supply to provide 5V from ship's 12V power.
Making Room
The BBB has only 4GB internal storage. Much of this is consumed by the Debian Linux distribution. We ran Debian 9 'bone-debian-9.9-iot-armhf-2019-08-03' before updating to Debian 10 'bone-eMMC-flasher-debian-10.3-iot-armhf-2020-04-06-4gb'. We knew we'd need more space for the InfluxDB database so we added a micro SD card. We've used 4GB and 32GB SD cards.
- Insert the SD card in the BBB
- Connect to BBB as 'debian'
- Run 'su'
- Run 'lsblk' to identify SDcard (usually /dev/mmcblk0p1)
- Run 'fdisk /dev/mmcblk0'
- 'd' to delete current partition
- 'p' to print the partition table
- 'n' to create new partition, then <enter> to take defaults
- 't' then '83' to set partition type to Linux (ext4)
- 'w' to write
- Run 'mkfs.ext4 /dev/mmcblk0p1' to create file system on the new partition
- Run 'lsblk' to check partitions (see first image below)
- Use nano to add a line to /etc/fstab: '/dev/mmcblk0p1 /media/sdcard auto auto,async,rw,nofail 0 0'
- Run 'reboot now'
- Reconnect to BBB as 'debian'
- Run 'lsblk' to check partitions (see second image below)
- Run 'df' to view space available
- Run 'sudo chmod 777 /media/sdcard'
- Run 'sudo mkdir /media/sdcard/influxdb'
 |
| 'lsblk' output before mounting |
 |
| 'lsblk' output after mounting |
Disable Services
The BBB runs a number of services which clash with putting SignalK's web server on IP port 80 and/or compete for resources. Here's what I disabled...
- Connect to BBB as 'debian'
- Run 'sudo systemctl disable cloud9.service'
- Run 'sudo systemctl disable gateone.service'
- Run 'sudo systemctl disable bonescript.service'
- Run 'sudo systemctl disable bonescript-autoscript.service'
- Run 'sudo systemctl disable bonescript.socket'
Remove cloud9
- Connect to BBB as 'debian'
- Run 'sudo rm -R /opt/cloud9 /var/lib/cloud9'
Install Dependencies
This was the toughest part. NodeJS is required by SignalK and it took me a while to realise the BBB had the wrong version installed. Likewise 'dns_sd.h' was reported missing. Hopefully the following is correct. If not Google is your friend, as it was mine!
Debian 9
- Connect to BBB as 'debian'
- Run 'sudo apt-get install libavahi-compat-libdnssd-dev'
- Run 'curl -sL https://deb.nodesource.com/setup_10.x | sudo bash -'
- Install specific version of NodeJS by running 'apt-get install nodejs=10.22.0-1nodesource1 -V'
Debian 10
- Connect to BBB as 'debian'
- Run 'sudo apt-get install software-properties-common'
- Run 'curl -sL https://deb.nodesource.com/setup_10.x | sudo bash -'
- Run 'sudo apt-get install libavahi-compat-libdnssd-dev'
SignalK Installation and Setup
- Connect to BBB as 'debian'
- Run 'sudo npm install -g --unsafe-perm signalk-server'
- Run 'sudo signalk-server-setup'
- Enter your boat's name and MMSI, and set IP Port to 80
Initial Run and ActiSense Connection Setup
- Connect to BBB as 'debian'
- Run 'signalk-server' to start the SignalK server
- In a remote browser (ie Macbook), open 'http://192.168.1.21' to access the server
- On the 'Server => Connections' page click on 'Add'
- Set ID to 'actisense'
- Set NMEA 2000 Source to 'Actisense NGT-1 (canboatjs)', noting the 'js'
- Set Serial Port to '/dev/serial/by-id/usb-Actisense_NGT-1_...', modifying the '...' to suit your BBB
- Accept defaults for the other fields and click 'Apply'
- On the 'Dashboard' page check the Stats show ActiSense data being received.
- On the 'Data Browser' page select 'Self' and check for data, noting the use of SI units.
The SignalK server starts automatically on boot.
Here are some screenshots, noting that some aren't from the BBB...
 |
| SignalK New Connection |
 |
| SignalK Dashboard |
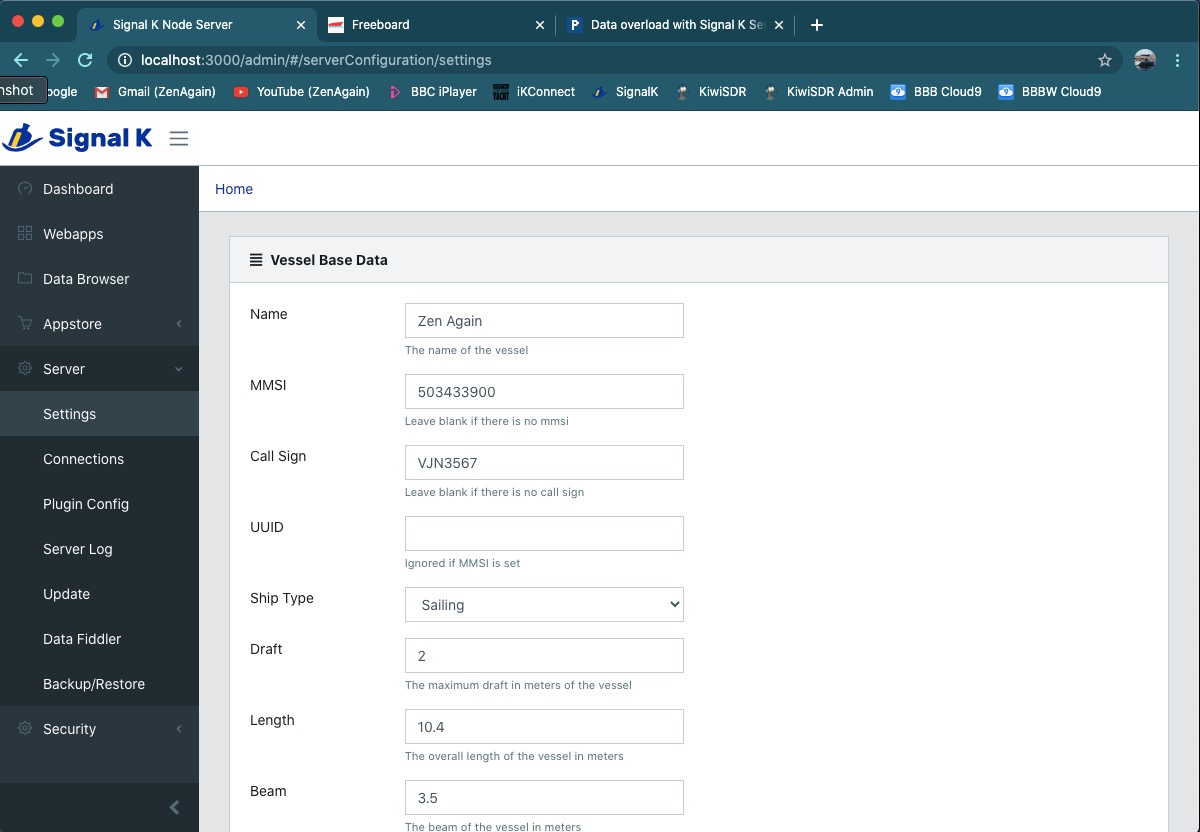 |
| SignalK Server Settings |
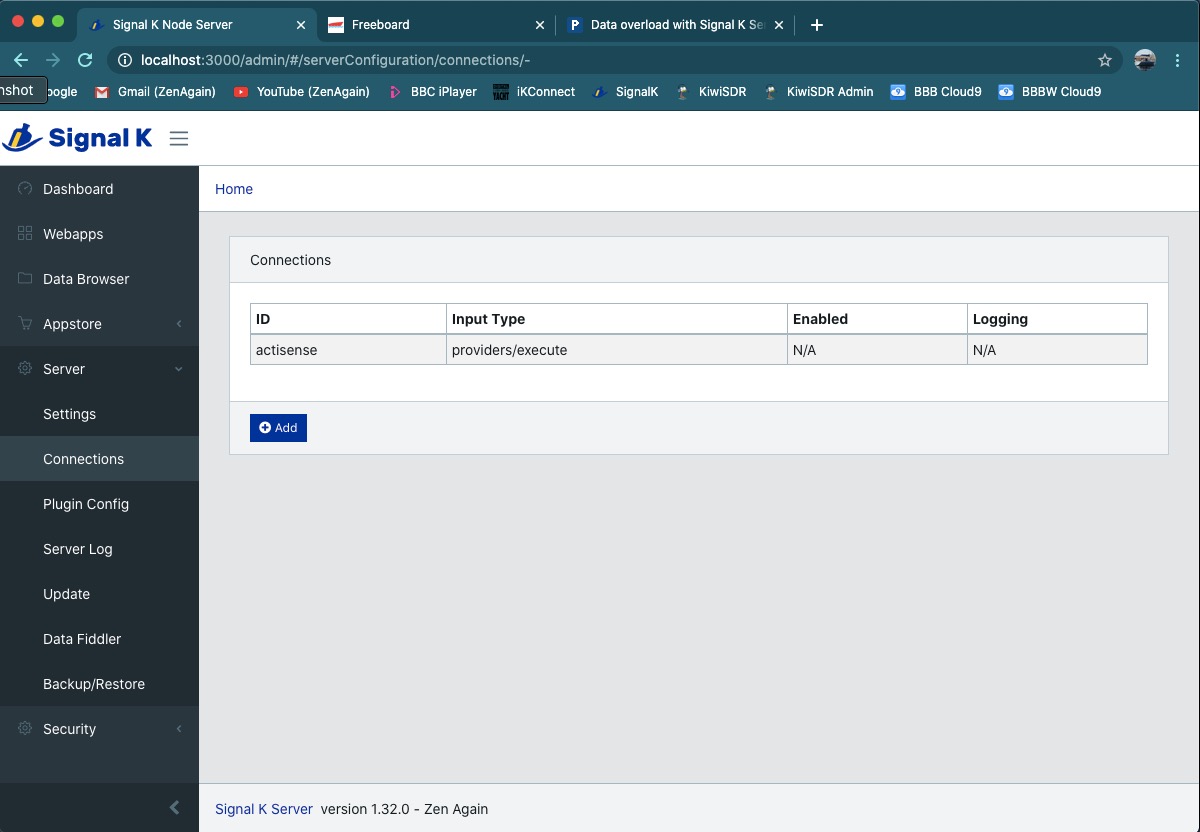 |
| SignalK Server Connections |
OpenCPN SignalK Connection
Use OpenCPN running on our Macbook to test availability of the SignalK data. OpenCPN support for SignalK began with version 5.2. Here's our OpenCPN connection setup...

OpenCPN SignalK Connection
 |
| OpenCPN SignalK Connection |
ActiSense Connection not working?
I had trouble using the ActiSense NGT-1 with canboatjs prior to SignalK Server version 1.34.0. The error was indicated on the Dashboard page. This simplest fix was...
- Connect to BBB as 'debian'
- On the 'Server => Connections' page click on the 'actisense' connection
- Change NMEA 2000 Source to 'Actisense NGT-1 (canboat)'
- Set Serial Port to 'dev/ttyUSB0'
- Run 'sudo reboot now' to reboot
- In a remote browser (ie Macbook), open 'http://192.168.1.21' to access the server
- On the 'Dashboard' page check the Stats show ActiSense data being received.
If the above fails try installing canboat separately. Here's how that's done...
- Connect to BBB as 'debian'
- Run 'sudo apt install xsltproc' since canboat needs xsltproc
- Run 'git clone https://github.com/canboat/canboat' to download canboat source
- Run 'cd canboat'
- Run 'make' to built the executables from the downloaded source
- Run 'sudo cp rel/linux-armv7l/* /usr/local/bin' to move the executables for use
- Run 'which actisense-serial' to check the executable we need is ready for use
- Run 'nano ~/.signalk/settings.json' and replace its contents with the text illustrated below, replacing '/dev/ttyUSB0' with the correct string for your NGT-1
- Run 'sudo reboot now' to reboot
- In a remote browser (ie Macbook), open 'http://192.168.1.21' to access the server
- On the 'Dashboard' page check the Stats show ActiSense data being received.
 |
| SignalK ~/.signalk/settings.json for canboat |
InfluxDB Installation
- Connect to BBB as 'debian'
- Run 'sudo apt install influxdb'
- Run 'which influxd'
Debian 10
- Connect to BBB as 'debian'
- Run 'sudo nano /lib/systemd/system/influxdb.service'
- Append ‘ media-sdcard.mount’ to After statement so influxdb service waits for SDcard to mount
InfluxDB Configuration
- Connect to BBB as 'debian'
- Run 'sudo chown influxdb:influxdb /media/sdcard/influxdb'
- Run 'sudo nano /etc/influxdb/influxdb.conf' and edit the three database pointers to suit the above locations.
InfluxDB Start
- Connect to BBB as 'debian'
- Run 'sudo systemctl unmask influxdb.service'
- Run 'sudo systemctl enable influxdb.service'
- Run 'sudo systemctl start influxdb'
The InfluxDB daemon will now start automatically on boot.
InfluxDB uses IP port 8086 to service client requests. It doesn't provide a web page but browsing there is a handy way to see if InfluxDB is running. Doing so produces a page with '404 page not found' text.
Another way to see if InfluxDB is running is to run 'ss -tlpn' which lists all ports on which the BBB is listening for traffic.
InfluxDB Database Creation
- Connect to BBB as 'debian'
- Run 'curl -X POST http://localhost:8086/query?q=CREATE+DATABASE+ZenAgain' to create influxdb database
- Run 'journalctl -u influxdb.service' to view the log
signalk-to-influxdb Installation
- In a remote browser (ie Mac), open 'http://192.168.1.21'
- Go to 'AppStore => Available' page, find the 'signalk-to-influxdb' entry and click on the download link on the right
- Go to 'AppStore => Installed' page and check 'signalk-to-influxdb' installed
- Connect to BBB as 'debian'
- Run 'sudo reboot' to reboot
- Back in the remote browser wait (several minutes) for the Server page to refresh then go to 'Server => Plugin Config' page, and click on 'Influx DB'
- On the page, tick the 'Enable' checkbox, enter 'ZenAgain' as the Database, then click on 'Submit' at the bottom
Here are some screenshots...
 |
| SignalK Server Plugin Config |
 |
| SignalK Server Plugin Config InfluxDB |
The BBB is now setup with SignalK and InfluxDB running. Lastly we need to tell our Mac (or other machine running Grafana) to read data from the BBB's InfluxDB.
Grafana Setup Modification on Macbook
- Open Grafana in browser at 'http://localhost:3001'
- In 'Configuration => Data Sources' click 'Add Data Source' then 'Influx DB'
- Set Name to 'InfluxDB-BBB' and switch Default on
- Set HTTP URL to 'http://192.168.1.21:8086' (don't leave it greyed-out)
- Set Influx DB Details Database to 'ZenAgain'
- Set Influx DB Details user/password to 'debian/password'
- Click 'Save & Test' and confirm all 'green'
- Open your Dashboards and check data is flowing from the BBB's database
Here are some screenshots...
 |
| Grafana Add Data Source (top of page) |
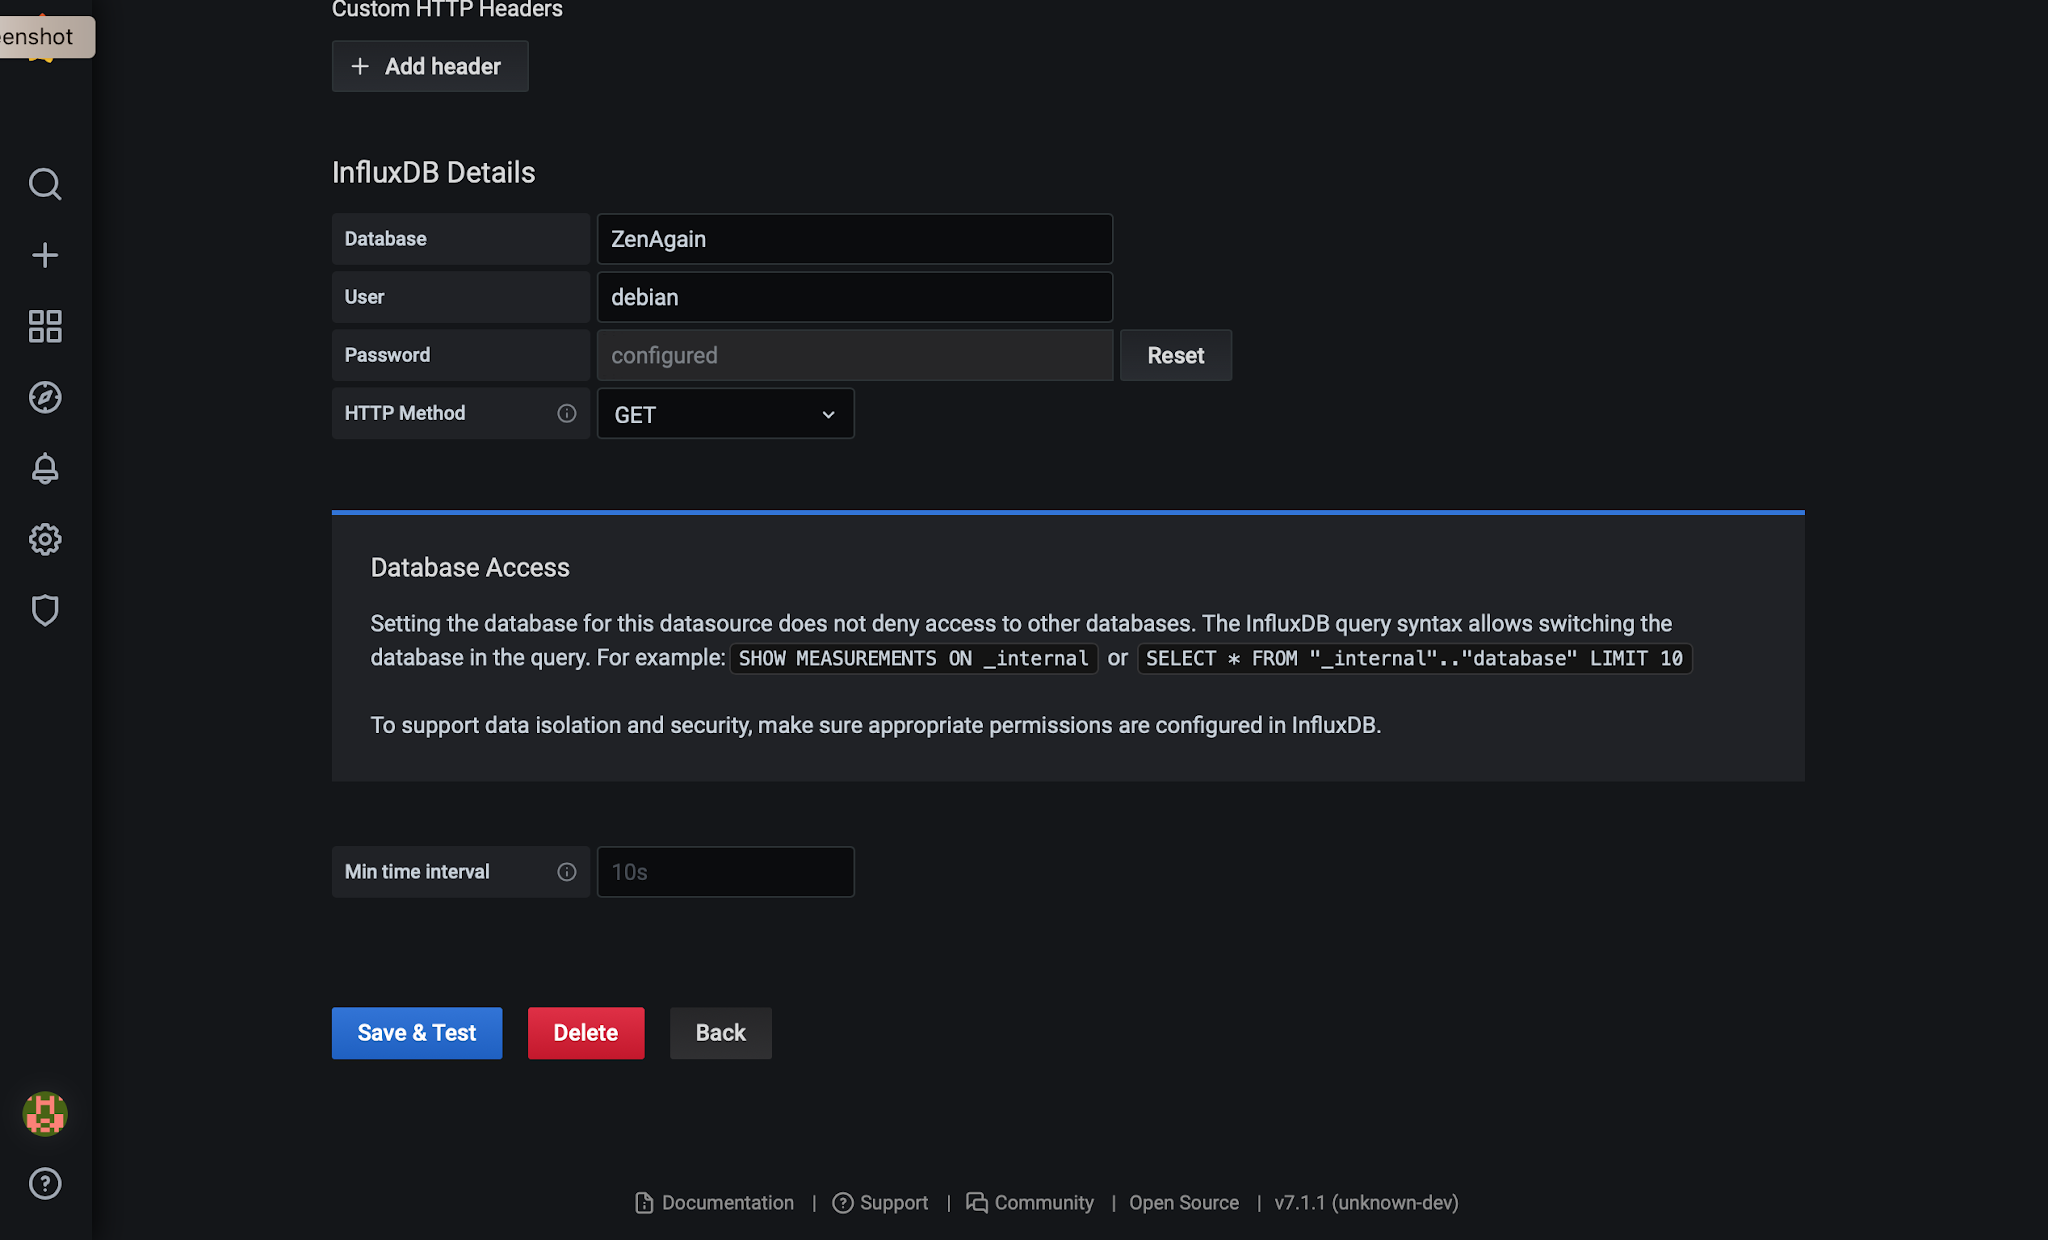 |
| Grafana Add Data Source (bottom of page) |
 |
| Grafana with 2 Data Sources |
It's worth noting that the Grafana Dashboards setup on the Macbook used the default Data Source for all their data. Adding the BBB Data Source and making it the default brought the Dashboards to life immediately. Very nice.
Overall Usage
We've been running SignalK and InfluxDB on our BBB for several months now, including for weeks at a time. No unexplained (ie non user error) crashes and so far it has used only 8% of the 32GB SDcard.
Backup
Here's how I backup the InfluxDB databases and the BBB generally...
- Connect to BBB as 'debian'
- Run 'sudo systemctl disable signalk.socket'
- Run 'sudo systemctl disable signalk.service'
- Run 'sudo systemctl stop signalk.socket'
- Run 'sudo systemctl stop signalk.service'
- Run 'sudo systemctl stop influxdb'
- Run 'sudo tar -cvf /media/sdcard/backup/<date>_bbb_influxdb.tar /media/sdcard/influxdb'
- In a Terminal window on the Macbook run 'scp debian@bbb:/media/sdcard/backup/<date>_bbb_influxdb.tar .'
- Back on the BBB, run 'sudo umount /media/sdcard'
- Remove the InfluxDB SD card from the BBB
- Insert a backup SD card into the BBB
- Run 'sudo /opt/scripts/tools/eMMC/beaglebone-black-make-microSD-flasher-from-eMMC.sh'
- When the BBB powers down on completion of the backup, remove the backup SD card
- Insert the InfluxDB SD card into the BBB
- Power up the BBB
- Connect to the BBB as 'debian'
- Run 'df' to check /media/sdcard connected
- Run 'sudo systemctl enable signalk.service'
- Run 'sudo systemctl enable signalk.socket'
- Run 'sudo systemctl start signalk.service'
- In a browser on the Macbook check the Signal K Server and Grafana are functioning normally
Upgrading SignalK
I had problems upgrading SignalK from within the browser. Instead I did this...
- Stop SignalK as described above (steps 1..3)
- Run 'sudo npm install -g --unsafe-perm signalk-server'
- While updating SignalK perhaps do the same for Debian generally...
- 'sudo apt-get update'
- 'sudo apt-get upgrade'
- Run 'sudo reboot now'
Recent Steps
We now have SignalK and InfluxDB installed and tested on three Beagles. Two BBBs (active and spare) plus a BeagleBone Black Wireless as a demo unit. We transmit SignalK data to our Macbooks, iPads and iPhones using the WilhelmSK app. We also feed wired SignalK-generated NMEA0183 to our autopilots.
Improving Usability and Reliability
Modify restart of SignalK service to simplify stopping/restarting for backups...
- Edit /etc/systemd/system/signalk.service, changing to 'Restart=on-failure'
Auto-reboot daily (below at 23:50) to stop /dev/mmcblk1p1 gradually filling to capacity...
- Use 'sudo crontab -e' to append '50 23 * * * /sbin/reboot'
Backup InfluxDB database monthly and create new, to avoid BBB slowing to a crawl and losing data...
- sudo systemctl stop signalk.service
- sudo systemctl stop signalk.socket
- sudo systemctl stop influxdb
- cd /media/sdcard
- sudo tar -cvf ./backup/<year+month>_influxdb.tar ./influxdb
- sudo rm -rf influxdb/*
- sudo systemctl start influxdb
- curl -X POST http://localhost:8086/query?q=CREATE+DATABASE+ZenAgain
- sudo reboot
No comments:
Post a Comment